Heads up — this is the DIY route
Building this means setting up Home Assistant yourself, creating a free Google Cloud project for the calendar OAuth, and importing an automation. It's not hard if you've ever set up a router or a smart bulb — but it's not a plug-and-play product either.
Good fit if…
- You're comfortable following technical instructions
- Your relative is in the mild-to-moderate stages of dementia
- The home has reliable Wi-Fi
- Family can manage a shared Google Calendar
- You'd rather run things locally than pay a subscription
Not the right fit if…
- You need an emergency or safety-monitoring system
- A missed reminder would create real medical risk
- Nobody in the family wants to maintain Home Assistant
- You want phone support and someone to call
If any of those apply, see RemindMeVoice — the managed version of the same idea, built for families who want spoken reminders without Home Assistant, Google Cloud, or YAML.
At a glance
- Time
- 2–4 hours, more if you're new to Home Assistant
- Difficulty
- Moderate — fine if you've ever set up a router
- Hardware cost
- ~£150 if buying everything new
- Ongoing maintenance
- Low, but not zero — occasional Home Assistant updates
- Fiddliest step
- Google Calendar OAuth (the one-time Cloud Console setup)
- Day-to-day for your relative
- Press one button → hear the time, the day, and today's plans
You'll also need
- A free Ethernet port on your relative's router
- Their Wi-Fi name and password
- A Google account
- A shared Google Calendar (the family will add events here)
- A laptop or phone for the setup itself
- Someone in the family who can keep an eye on it occasionally
Why I built this
I put the first version of this together for my own family. We'd watched a relative with dementia get lost in clocks, phones, calendars, and well-meaning smart speakers — none of which answered the only question that mattered most days: "What's happening today?" A button and a calm voice answered that cleanly, and kept on answering as things got harder. This guide is that setup, cleaned up so other families can build the same thing.
The problem
This guide walks through building a Home Assistant voice reminder using a Google Calendar and a Home Assistant Voice PE — a DIY dementia reminder button for an elderly parent or older relative whose memory problems make screens, apps and calendars hard to follow. It uses Home Assistant reminders and a Google Calendar voice reminder pipeline. It is not a medical device, and works best for families with some technical confidence.
Phones, calendars, smart speakers, and apps can be confusing for someone living with dementia. Even reading a clock or making sense of today's date can become an effort — the information is there, but processing it isn't always easy.
Families often want a calm way to remind their relative what's happening today: visits, appointments, mealtimes. Something they don't have to unlock, charge, or learn. Something that just speaks.
That's what this guide builds — a single physical button and a speaker that reads today's plans in plain English. Your relative interacts with one thing. The family adds reminders to a calendar from anywhere.
What this setup does
One button to press. One calm voice. Everything else managed by family.
One-button simplicity
Press and hold the speaker's button. That's the whole interaction. No menus, no wake-word.
Time and day, spoken
Each press starts with the day of the week and the time in plain English — useful when reading a clock has become an effort.
Today's plans
Reads out calendar events for the day in plain language: visits, appointments, mealtimes.
Managed remotely
Family adds events to a shared Google Calendar from any phone or laptop. No need to be there.
No always-on mic
The speaker only does something when the button is physically pressed. Nothing listening passively.
Runs in your home
Home Assistant runs locally on a small device. Calendar and voice are the only cloud parts.
How it works
Four pieces, one flow.
The flow:
- Family adds appointments and reminders to a shared Google Calendar.
- Home Assistant (running on a small box at your relative's home) checks the calendar.
- Your relative presses and holds the button on top of the speaker.
- The speaker reads out the day, time, and today's events in a natural voice.
Recommended hardware
Two small devices — that's the entire kit. Both are official Home Assistant products and work together out of the box.
Affiliate disclosure: Some links on this page may be affiliate links. If you buy through them, I may earn a small commission at no extra cost to you. I only recommend hardware I've actually used in this setup, or close equivalents.
Home Assistant Green
~£99The small green box that runs Home Assistant. Plugs into your relative's router with the included Ethernet cable.
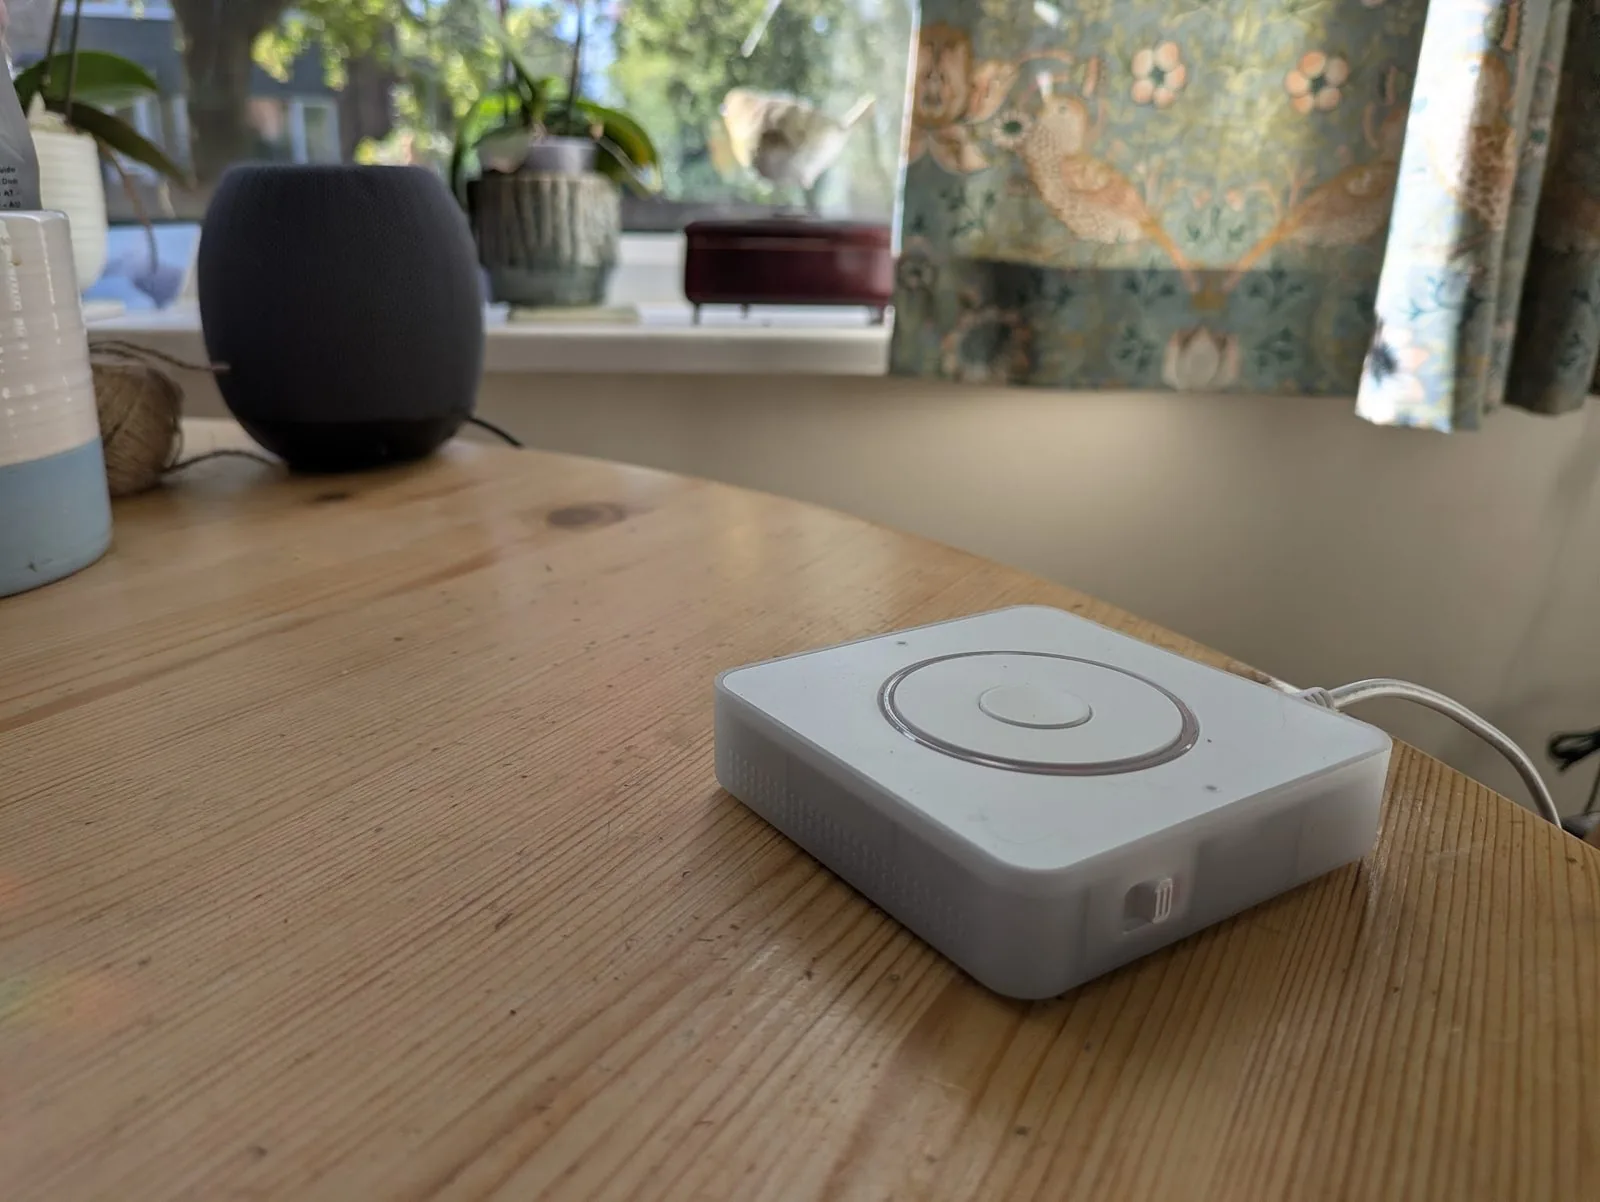
View on AmazonHome Assistant Voice PE
~£50The round speaker with a button on top. Plugs into a USB-C power supply and connects to the home Wi-Fi.
View on AmazonStep-by-step setup
Click any step for the full walkthrough. The blueprint at the end takes care of the automation itself — these steps cover everything around it.
-
Plug in the HA Green
Ethernet to the router, USB-C power. Wait for the LED to turn solid green (~2 minutes).
Show the full walkthrough
- Connect the included Ethernet cable from your relative's router to the HA Green's Ethernet port.
- Plug the included USB-C power cable into the HA Green and into a wall socket.
- Wait around two minutes. The LED on top will pulse while booting, then turn solid green when ready.
If the LED doesn't turn green
First boot can take five minutes or more if the device is downloading updates — give it ten before worrying. If it's still pulsing or off after that, check the Ethernet cable is fully seated and the wall socket is on.
-
Open Home Assistant in a browser
Go to
http://homeassistant.local:8123and create your admin account.Show the full walkthrough
- From a laptop or phone on the same Wi-Fi as the HA Green, open a browser.
- Go to
http://homeassistant.local:8123. - You'll see "Preparing Home Assistant" — first boot can take up to twenty minutes (it's downloading the latest version). Be patient.
- Once ready, follow the prompts to create your admin account, set the home location on the map, and pick country, language and time zone.
- Before continuing, install all available updates: Settings → System → Updates. Newer integrations need recent versions of HA.
If
homeassistant.localdoesn't loadSome routers don't resolve mDNS names. Try one of:
http://homeassistant:8123(no.local)- Find the IP from the router's admin page — look for a device named
homeassistant— and visithttp://[that-ip]:8123.
-
Set up the Voice PE
Pair it with the home Wi-Fi over Bluetooth, then let HA auto-discover it under ESPHome.
Show the full walkthrough
- Plug the Voice PE's USB-C power cable into the device and into a wall socket. The LED ring will pulse to show it's in setup mode.
- Pair it with your relative's Wi-Fi. The Voice PE uses Bluetooth-based provisioning (the Improv standard). On a phone or laptop with Bluetooth, open home-assistant.io/voice-pe in Chrome (or use the Home Assistant Companion app) and follow the setup flow.
- You'll be asked to briefly press the button on top of the Voice PE to confirm pairing. Then enter the home Wi-Fi name and password — the device joins the network.
- Once on the network, Home Assistant auto-discovers it. In HA, go to Settings → Devices & Services — you should see a "Discovered" card for the Voice PE. Click Configure to add it.
- The device now appears under the ESPHome integration with all its entities.
Find the entity IDs you'll need later
Settings → Devices & Services → ESPHome, click on your Voice PE device. You'll see a list of entities — note down the names of:
- The media player (looks like
media_player.home_assistant_voice_XXXXXX_media_player) - The button event entity (
event.home_assistant_voice_XXXXXX_button_press) - The LED ring (
light.home_assistant_voice_XXXXXX_led_ring)
Optional but recommended: silence the single press
The Voice PE's single press is hardwired at firmware level to the voice assistant pipeline — it can't be turned off, but you can make it do nothing noticeable.
- Settings → Voice Assistants → Add Assistant. Name it "Silent". Leave Speech-to-text and Text-to-speech blank. Save.
- Back in Settings → Devices & Services → ESPHome → your Voice PE, set both "Assist pipeline" slots to Silent.
- Set "Wake word" to
no_wake_wordin both slots, and turn "Wake sound" off.
-
Connect a Google Calendar
Add the Google Calendar integration in HA — this is the calendar the family will update remotely.
Show the full walkthrough
This is the fiddliest part of the whole setup, but you only do it once. You'll need a Google account with access to the calendar your family will use.
Part A — create the Google Cloud project
- Go to console.cloud.google.com and sign in.
- Click the project dropdown at the top → New Project. Name it "Home Assistant" → Create.
- Make sure the new project is selected in the dropdown.
Part B — enable the Calendar API
- APIs & Services → Library.
- Search for "Google Calendar API". Click it → Enable.
Part C — configure the OAuth consent screen
- APIs & Services → OAuth consent screen.
- Choose External → Create.
- Fill in app name (Home Assistant), your email, support email. Continue through the steps — you can skip the scopes section.
- On the OAuth consent overview, click Publish App and confirm. Only your account will use this; publishing just exempts you from being a "test user" who has to re-authorise every week.
Part D — create OAuth credentials
- APIs & Services → Credentials.
- + Create Credentials → OAuth client ID.
- Application type: Web application. Name: "Home Assistant".
- Under Authorized redirect URIs, add:
https://my.home-assistant.io/redirect/oauth - Click Create. Copy the Client ID and Client Secret — you'll paste them next.
Part E — add the integration in HA
- Settings → Devices & Services → + Add Integration → "Google Calendar".
- Paste your Client ID and Client Secret. Submit.
- A new tab opens — sign in to Google and click Allow.
- Back in HA, you'll see the calendars on your Google account listed.
Note the calendar entity ID
Settings → Devices & Services → Google Calendar — note the entity ID of the calendar you'll use (e.g.
calendar.shared_family_calendar). You'll pick this from a dropdown when configuring the blueprint. -
(Optional) Set up Google Cloud TTS
For a more natural-sounding voice. The built-in Piper TTS works fine if you'd rather skip this.
Show the full walkthrough
The local Piper TTS works fine and is fully offline, but Google Cloud TTS sounds dramatically more natural — especially in British English. The free tier covers around a million characters per month, far more than daily button presses will use.
You'll reuse the same Google Cloud project from the calendar step.
Enable the Text-to-Speech API
- Go to the Text-to-Speech API page.
- Make sure your project is selected at the top. Click Enable.
Create a service account key
- Go to Service Accounts.
- + Create Service Account. Name: "home-assistant-tts" → Create and Continue.
- Skip the role/permissions steps (Continue → Done).
- Click your new service account → Keys tab → Add Key → Create new key → JSON → Create.
- A
.jsonfile will download. Keep it somewhere safe — you'll paste its contents into HA next.
Add the integration in HA
- Settings → Devices & Services → + Add Integration → "Google Cloud".
- Paste the entire contents of the
.jsonfile. Submit.
Configure the voice
- Settings → Devices & Services → Google Cloud → Configure.
- Language:
en-GB - Voice:
en-GB-Neural2-A(British female, very natural). Tryen-GB-Neural2-Bfor male. - Submit.
The TTS entity will be
tts.google_cloud— you'll pick this in the blueprint. - Import the blueprint One click — see the blueprint section below. Opens directly in your Home Assistant.
- Fill in the dropdowns Pick your speaker, calendar, button entity, voice, and your relative's name. No YAML to write.
-
Test it
Press and hold the button. Listen. Adjust the wording, the voice, or the time-of-day greetings to taste.
Show the full walkthrough
- Press and hold the button on top of the Voice PE for around two seconds, then release.
- The LED ring should light warm-amber and a voice should start speaking the day's summary.
If nothing happens
- Settings → Automations — make sure the imported automation is enabled (toggle on).
- Click into the automation → Traces tab — recent runs and errors show here.
- Settings → System → Logs — look for anything red or yellow related to the automation.
The greeting changes by time of day
Morning, afternoon, evening, and night each have slightly different greetings. The bedtime nudge between 19:00 and 21:00 is intentional — part of the routine cue, not a bug.
- Place and label it Put the speaker somewhere your relative already looks — kitchen table, by their chair. Add a small label: "Press and hold for today's plan."
Import the blueprint
One automation, packaged as a Home Assistant blueprint. Click the button below and it opens directly in your HA — no YAML editing.
What you'll be asked to fill in:
- Person's name — used in the greeting ("Hello Mum.").
- Voice PE button event — the device's long-press event entity.
- Voice PE speaker — the media-player entity that plays the summary.
- Voice PE LED ring — lit warm-amber while speaking.
- Text-to-speech engine — Google Cloud TTS for natural voice, or Piper for fully local.
- Calendar — the shared Google Calendar with today's events.
The blueprint listens for the long-press, fetches today's events from the calendar, and speaks a friendly summary — day, natural time of day, what's on, and gentle bedtime nudges in the evening. The wording is plain English and the cadence is calm.
The import button uses My Home Assistant to open the blueprint in your HA instance — you'll be asked which instance to use the first time.
Safety and limitations
This is not a medical or emergency system
This guide is based on practical family experience. It is not medical advice, clinical care guidance, or an emergency system. For safety, health, medication management, falls, wandering, or urgent care needs, speak to qualified professionals and use dedicated care systems.
Use this setup for everyday convenience, routine support, and reassurance — not as the only thing standing between your relative and a medical or safety problem. Always have backup processes in place: regular check-in calls, a key-holder nearby, and a proper personal alarm if their needs warrant one.
Frequently asked questions
Is this a medical device?
Does my relative need to use a smartphone?
Do I need Home Assistant experience?
Can a caregiver manage the reminders remotely?
Can it remind someone about medication?
Does it need Wi-Fi?
Will this work outside the UK?
What happens if the internet goes down?
Can I use Apple Calendar or Outlook instead of Google Calendar?
calendar.* entity and feed it into the blueprint.
Can it speak in other languages?
Can I trigger the reminder remotely?
Can I use a separate, bigger button?
I'd rather not DIY this — is there a managed product?
Advanced: customise this with Claude Code or another AI coding tool
This is for technical users only. You don't need any of this for the standard setup.
If you're comfortable with AI coding tools — Claude Code CLI, GitHub Copilot CLI, Cursor, and similar — Home Assistant's REST API pairs beautifully with them. Create a long-lived access token (your HA profile → Security → Long-Lived Access Tokens), hand it to the agent along with your HA URL, and it can read entity states, push automation tweaks, query the logbook, and debug the daily summary directly from the terminal.
If you want to customise the wording, add new prompts, or troubleshoot remotely, this turns a fiddly UI process into a conversation.
Security note: the token grants full access to your Home Assistant. Use it only on your own machine with tools you trust. Never paste a Home Assistant access token into a public web chat or untrusted tool. Treat the token like a password and revoke it from the same screen when you're finished.
Questions & updates
Got a question, suggestion, or something stuck? Drop it below and I'll reply by email. Tick the box if you'd also like a note when new blueprints land (TV control, routine reminders, quiet-day alerts).
Thanks — got it
I'll reply by email if you've asked something. Otherwise, you'll hear from me when new blueprints land.